Product FAQs
Crock-Pot® 6.0-Quart Express Crock
Pressure cookers generate steam in order to build pressure. Liquid is needed to create steam. So in order for your Express Crock to build enough pressure to cook your meal, there needs to be enough liquid in the pot to boil and generate steam. One cup – or 8 oz – of liquid (it can be water, chicken broth, etc) is usually enough liquid to successfully build pressure.
Although none of the buttons on Express Crock are labeled as “Manual” pressure, it is very easy to do. If you have a pressure recipe that requires a manual setting – or if you simply want to pressure cook using your own pressure setting and cook time – then select any of the “One-Touch Meal” pressure setting options below and adjust the pressure and cook time as needed.
- BEANS/CHILI
- DESSERT
- SOUP
- Press the START/STOP button to begin the delay feature.
- The timer and DELAY TIMER button will stop flashing, while the START/STOP button will continue flashing.
- This will indicate that the Multi-Cooker has been set on the DELAY TIMER setting.
- The Display Screen will count down the delay time until 0:00 is reached. When 0:00 is reached, the DELAY TIMER light will turn off and the START/STOP light will stop flashing to show that time delay has finished.
- If using a pressure function, the word “HEAT” will appear on the display screen until the Multi-Cooker is fully pressurized. When the selected pressure has been reached, the timer will start counting down.
- After cooking cycle is complete, let Multi-Cooker naturally release pressure through the Bobber Valve.
- Unit will gradually cool down on its own. Wait at least 10 minutes after cooking has completed, and then, using a kitchen utensil, flick the tab on the Steam Release Valve to the “Release” position.
- Do not place any part of your hand or body over the steam outlet on top of the valve, as steam is very hot and can scald skin.
- The pressure has been released when steam is no longer escaping from the valve and the Lid opens freely with minimal force. Only then is it safe to remove the Lid and serve food.
- Using a kitchen utensil, flick the tab on the Steam Release Valve to the “Release” setting.
- Steam will release rapidly from the Steam Release Valve. Do not place any part of your hand or body over the steam outlet on the top of the valve, as steam is very hot and can scald skin.
- Never use this method when cooking liquid ingredients such as casseroles, stocks and soups. For these, please use the Natural Release Method, waiting at least 10 minutes after cooking is complete to rotate the Steam Release Valve.
- Never use this method when cooking rice, as rice tends to be very delicate.
- The pressure has been released when steam is no longer escaping from the valve and the Lid opens freely with minimal force. Only then is it safe to remove the Lid and serve food.
CAUTION:
- 1.Do not force the Lid to open. If it does not open easily this means that the Multi-Cooker is still under pressure.
- 2.During cooking, steam will build up in the Multi-Cooker, so when lifting the Lid use a kitchen glove or mitt to protect your hand.
- Slow Cook – High Temp / 4 hours – 30 minutes – 2 hours
- Steam – High pressure / 10 minutes – 3 minutes – 1 hour
- Brown Saute – High Temp / 30 minutes – 5 minutes – 30 minutes
- Keep Warm – Warm Temp / 4 hours – 30 minutes – 4 hours
- Meat/Stew – High Pressure / 35 minutes – 15 minutes – 2 hours
- Beans / Chili – High Pressure / 20 minutes – 5 minutes – 2 hours
- Rice / Risotto – Low Pressure / 12 minutes – 6 minutes – 30 minutes
- Yogurt – Low Temp / 8 hours – Low 6 hours – 12 hours
- Poultry – High pressure / 15 minutes – 15 minutes – 2 hours
- Dessert - Low pressure / 10 minutes – 5 minutes – 2 hours
- Soup – High pressure / 30 minutes – 5 minutes – 2 hours
- Multigrain – High Pressure / 40 minutes – 10 minutes – 2 hours
It’s easy to switch functions during cooking:
- Press the START/STOP button and then select the new desired cooking function.
- A new timer will flash on the Display Screen, and the selected function will also flash.
- Select the desired time, pressure, and/or temperature.
- Press the START/STOP button and the new function will begin preheating.
To Change the Cooking Time::
- You can change the cooking time before cooking begins by pressing the + and - buttons before pressing START/STOP.
- Press and release to change slowly. Press and hold to change time quickly.
- If you pass the desired temperature or time, press the opposite button.
To Change the Pressure::
- You can change the pressure on certain pre-set functions before cooking begins by pressing the PRESSURE ADJUST button before pressing START/STOP.
To Change the Temperature:
- You can change the temperature on certain functions before cooking begins by pressing the TEMP ADJUST button before pressing START/STOP.
Is there a minimum or maximum content level?
- Yes. When using a pressure cooking function, there should be at least 8oz of liquid inside the Cooking Pot.
- When slow cooking, the Cooking Pot should be 1/3-2/3 full for optimum cooking results.
- Never fill above the “MAX” line.”
If you receive this code while using one of the pressure cooking settings, then the lid probably did not close or seal correctly.
To resolve, follow the steps below:
- 1. Rotate the Steam Release Valve to the “Release” position and wait for the unit to de-pressurize.
- 2. Take off the lid and look underneath to make sure the Sealing Gasket (large rubber ring) is properly secured to the underside of the lid.
- 3. If your recipe looks like it may need more liquid now that you have released some of the steam after removing the lid, then add more, stir your ingredients, and reattach the lid, making sure the Steam Release Valve is in the “Seal” position.
- 4. Unplug the unit for at least 5 seconds, and then re-plug it in and re-program your cook settings to begin cooking.
If you receive the E4 notification code:
- The Multi-Cooker will stop the cooking cycle.
- Unplug Multi-Cooker, and allow to cool down completely.
- Once Multi-Cooker has cooled down, check cooking pot to ensure there is enough liquid inside.
- Add more liquid if necessary (Minimum 8olz).
- Ensure no steam is coming out of the Cooking Pot before placing Lid back on the Multi-Cooker.
- Turn Lid to LOCKED position.
- Ensure Steam Release Valve is in “Seal” (Closed) position.
- Select a pressure cooking function, and press START/STOP.
This notification occurs when the Express Crock attempts to begin a new cooking or pressurization cycle after it is already pressurized.
To resolve, follow the steps below:
- 1. Rotate the Steam Release Valve to the “Release” position and wait for the unit to de-pressurize.
- 2. If your recipe looks like it may need more liquid now that you have released some of the steam after removing the lid, then add more, stir your ingredients, and reattach the lid.
- 3. If you were using a pressure setting, make sure the Steam Release Valve is in the “Seal” position. Otherwise, the Steam Release Valve should be placed in the “Release” position if you were trying to use a non-pressure setting (like Slow Cook).
- 4. Unplug the unit for at least 5 seconds, and then re-plug it in and re-program your cook settings to begin cooking.
If you receive the E5 notification code:
- This code appears when either the lid or Steam Release Valve is being used incorrectly for a non-pressure cook setting.
- Please note that the lid should never be used when using the Brown/Sauté setting. When using the lid during the Slow Cook or Yogurt settings, the Steam Release Valve must be turned to the open or “Release” position.
If you receive the E5 Notification during any of these situations, then simply remove the lid while using Brown/Sauté, or correctly position Steam Release Valve to “Release” while using Slow Cooking or Yogurt, and then unplug the unit for at least 5 seconds, re-plug it in and re-program your cook settings to begin cooking.
The E6 notification code:
If you receive this code while cooking, it means that the Express Crock was unable to generate enough steam to pressurize completely.
To resolve, follow the steps below:
- 1. Make sure that the Steam Release Valve is turned to the closed or “Seal” position. If it was not in the correct position, then rotate it to the correct position and jump to step 3 below.
- 2. If the Steam Release Valve was in the correct position, then turn it to the “Release” position and wait for the unit to de-pressurize. Then remove the lid and look underneath it to make sure the Sealing Gasket (large rubber ring) is properly secured to the underside of the lid.
- 3. Add another cup of liquid (water, broth, etc) to the cooking pot, stir your ingredients, and reattach the lid, making sure the Steam Release Valve is in the “Seal” position.
- 4. Unplug the unit for at least 5 seconds, and then re-plug it in and re-program your cook settings to begin cooking.
- When pressure cooking, ensure there is a minimum of 8oz of liquid in the Cooking Pot.
- Never fill the Cooking Pot past the MAX line.
- Do not leave Multi-Cooker plugged in when not in use.
- Make sure Multi-Cooker is kept away from cabinets and walls when in use.
- The Cooking Pot is designed to be used only in this Multi-Cooker. Do not use on stovetop, in microwave, or in oven.
- The provided Steaming Rack is designed to be used in this Multi-Cooker. It should not damage the surface of the Cooking Pot.
- When removing the Lid, use a pot holder to grasp the Lid Handle and lift away from your body to allow steam to escape.
- Always place a trivet or pot holder under the Cooking Pot if it is removed from the Heating Base
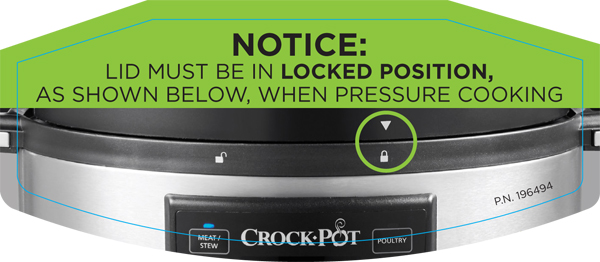
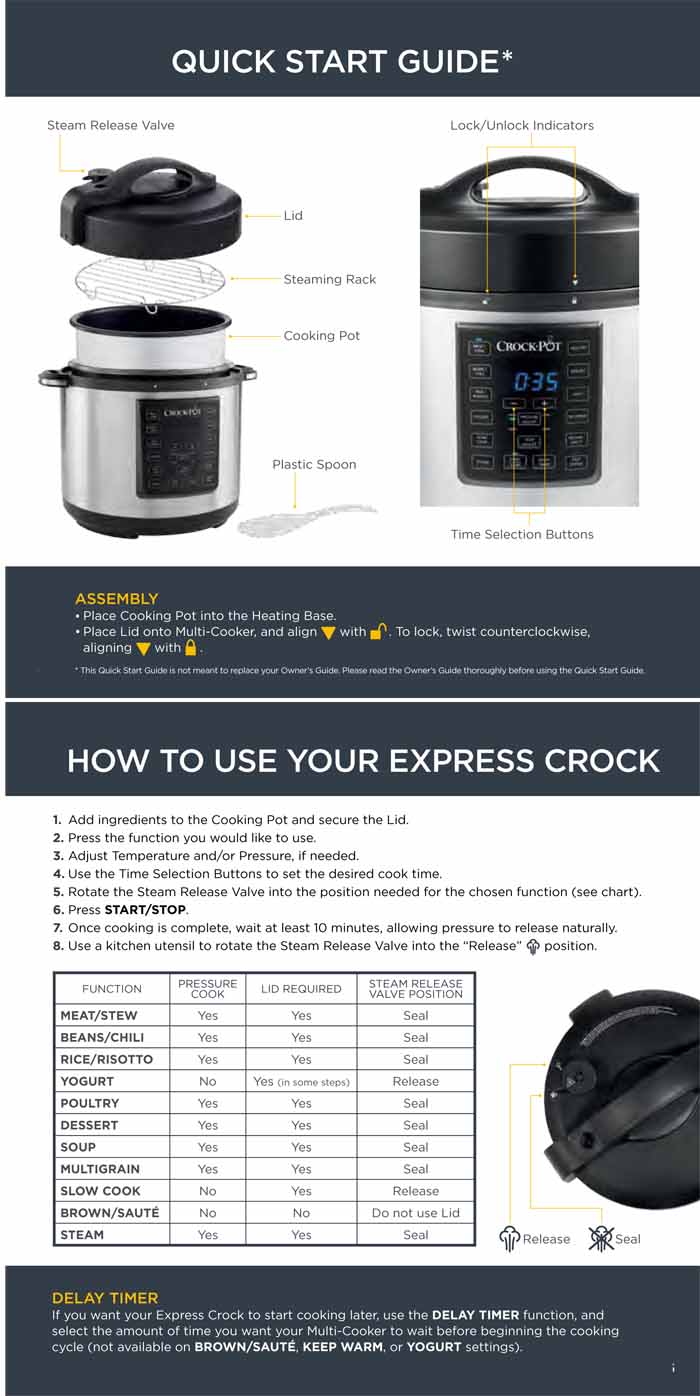
To ensure lid is fastened in locked position, place the lid upon the Multi-Cooker and be sure that the downward facing arrow (on lid) aligns with the unlocked symbol. To lock, turn counterclockwise aligning the downward facing arrow aligns with the locked symbol.